Wednesday, September 14, 2016

From dining room to learning room - Part 2 - purposeful wall space


Disclosure: This blog post contains affiliate links for products I recommend. I don’t link to anything I haven’t purchased myself or fully support!


I probably over think the placement of our homeschool items and supplies.  I can also get a little OCD about closets, toy bins and even silverware.  So I'm going to claim that it's a gift and I'm not afraid to use it!

Creating Purposeful Spaces

 When I was a classroom teacher, I really want to make sure that every space was purposefully used and utilized by 20+ kiddos.
Here's one of my favorite Reading Corners in my 1st grade classroom.  Cozy, Comfortable and Purposefully used!


So this "gift" has been a great addition to creating purposeful spaces within our homeschool.  


My last post was all about repurposing that LONG Ikea shelf.  If you missed that post, check it out here:

Part 1 - Repurposing THAT shelf


Today, I want to take you over to the window wall in our newly, transformed Learning Room.  Windows can be a great place to hang charts, map and/or create a clothesline of kiddo's art work or school papers.

That cute apple banner, I bought from Target in their $1 bin and thought it would be a fun accessory to start off September! But in the past, I've hung the children's work up there, like in this picture.
 During our 2 week Olympic study, we would hand finished products that reflected what we had learned that day.

I simply used a piece of yarn, 2 small cup hooks (screwed them into the window frame) and mini clothes pins or paper clips.  I like using the mini-clothes pins (or paper clips) because they are light in weight.  FYI:  The larger clothespins sag the line and sometimes flips the papers upside down.

When you lose wall space because of a large window, you have to find ways to use it!
Here's another idea for hanging things from your mini-blinds.

We use this map just about everyday!  So I bought these hooked clips from Ikea (click here for Ikea website)  The hook can swing around your mini-blink strings or the mini-blind itself.  And you have a simple way to display charts, maps or even more work.

Moving on down... the window sill is a great way to display special books.
If books are visible, they will read them!

I flirted with the idea of drilling holes into this small Ikea picture frame shelf but I came up with a different idea that I am thinking I will like even more!


Do you know what a "base shoe" is?  It's the piece of what that completes the look between your baseboards and floors.  It looks like this.

I am thinking of nailing a "base shoe" along the length of my window sill to create shelf-like ledge to display our library books.  This base shoe will help balance the books so they can lean up against the window and not slip off onto the floor.  I hope my thinking makes sense.

And I'll be sure to post a finished picture of what that all looks like.

Another option that I've thought about would be this:
I just need to see which project my husband is ready to take on.  I'm unsure about the Ikea shelf being strong enough (and centered) if we can't screw the shelf into the wall studs.

So many crazy ideas, just for books!  But I keep reminding myself..."it's all about creating purposeful spaces that make learning easy and accessible!"

So that's a wrap on creating purposeful wall space!  I hope that I've inspired you to try one or all of these ideas.

The next blog post will be the other wall in our Learning Room...the one you can see in the picture above that holds our calendar.  So be sure and check back then.

Until then...Happy Learning with your Little Ones!

Thursday, September 8, 2016

From dining room to learning room - Part 1 - Repurposing THAT shelf


Back in January, the baby officially became a big boy!  No need for a nursery when you have a big boy in the house. AND 3 boys, at the right age, that can easily share a room.

That nursery became an office...My very own homeschool office!  In the past (at other homes), I had always converted a closet into my office.  I had never had a WHOLE room!!! How exciting, right?
*Side note - we have been in this house over 1 year.**

At the time, yes, it was exciting.  But that office quickly became a LARGE closet aka cutely, decorated storage unit.  It was the room that I would go to only when I need to grab the document that I had printed from our wireless printer.  I even told the cleaning lady not to worry about cleaning it!  Say what!?


A lot of this stuff wasn't getting used in our homeschool.  Which led me to set some goals that needed to reflect the use of materials and space.  And I simply started by asking these questions:

1)Where do we learn and play the most?
2)Are my resources and materials being used? Why or why not?
3)How can I create a new space without buying any new furniture?

And this is how I answered them:
1) We learn the most downstairs in the kitchen/dining table, couch or outside.
2) Nope!  My resources and materials are scattered all around the house.  Some are upstairs and some are downstairs.  Some are in the office and others are in the laundry room.
3) Could I thoughtfully reorganize my materials based on the types of storage that I have aka not buying any thing.  I could start by bringing everything downstairs (furniture and supplies) and see if it will work.  If it doesn't, get rid of it!

We started by turning out dining room into our learning room.  We brought down the long shelf for storage, adjusted the table to help utilize wall space and work space on the floor.


And then...I brought down ALL that had been stored upstairs that wasn't getting used!  Scary huh?  This took me a good day to get through it all.  It was a Saturday and the boys enjoyed some Daddy time while I went on a reorganizing redo!


 I also had to remember that I didn't have a baby anymore!  So the markers (washable), playdough, paint and such that had been sealed up and placed high could now come down.  

See these past posts on how I organized our last homeschool space at a different house.  


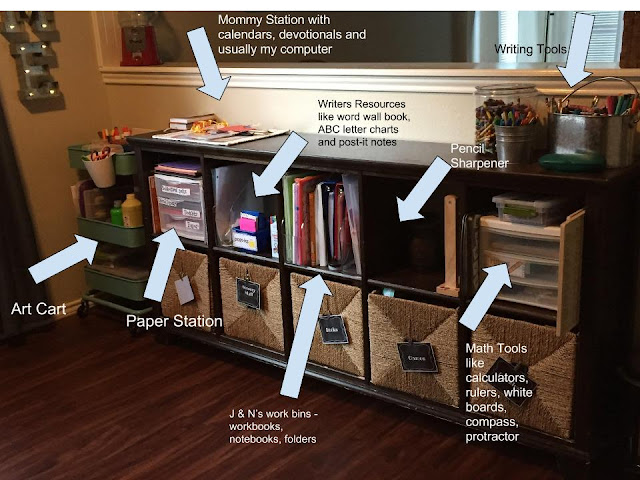
 And TAAAADAAAA!  Here's the finished product.  THAT shelf went from storing stuff to being used!  


I am a BIG fan of giving kids the freedom to use anything they'd like to learn with.  So I wanted this shelf to be all theirs!  The baskets are clearly labeled (I made them using Google Docs/Drawings).  And the boys even helped me put the label on each box.


We also turned this GREAT Ikea storage into our Art Cart!  It can roll around, inside or outside.  The kids can use ANYTHING, as long as they ask first and help clean up!

And I think the easy way to show our new and improved shelf, is by showing you this picture:

Will it look this perfect in a month or two?  YES!  And why?  Because I have trained my kiddos on where everything is and how to return it back to its spot!

As a former classroom teacher,  I led a successful classroom bc my kids felt valued to use any of our materials, as long as they used it with respect and as long as they returned it for the next person to use.

So that's exactly how I run OUR homeschool!  **Keep in mind that you have a different homeschool!  I hope this post inspires you to adjust your ideas to fit what works best for YOUR homeschool space!  But if it's a desire of yours to eventually create and keep an organized space, like this, set some small goals!  Try keeping just one area organized, then add another in a few months.  Include your kiddos!  That always makes a big difference for me!**

Come back and visit next week when I take you to the other side of our new learning room.  And from there, I'm going to show you our NEW STEAM CLOSET!!!!

Happy Learning with your Little Ones!

How to Host a Homeschool Workshop

I remember going to my first homeschool conference in Ft. Worth, Texas.  I walked up to a GIANT convention center and opened the doors into...